
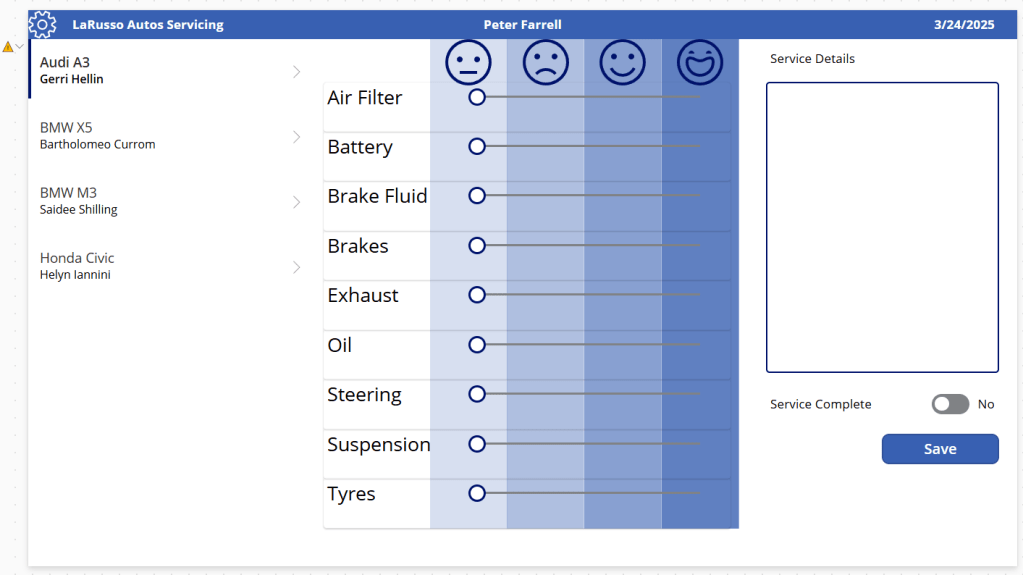
In our last post we took more control of the look and feel of our canvas app, using custom controls instead of Forms to improve the look and feel of our application. As outlined, this imposes more responsibility on the developer for building the user interface than using Forms (and more so than when using model-driven apps).
Today we look at what data responsibilities the developer has when building a canvas app, and we’ll make a few small changes to personalise the app to the current user.
To begin, I’ve made the following changes:
- Added a blue rectangle to the top of the screen as a header
- Resized the Gallery height to accommodate the header
- Added a settings icon to the left of the screen
- Added text labels to the header
- One with the app name
- One with the name of the logged in user
- One with the current date

For each of the three labels mentioned above, we set the text property of the label as follows:
- App name – “LaRusso Autos Servicing”
- Current user – User().FullName
- Current date – Today()

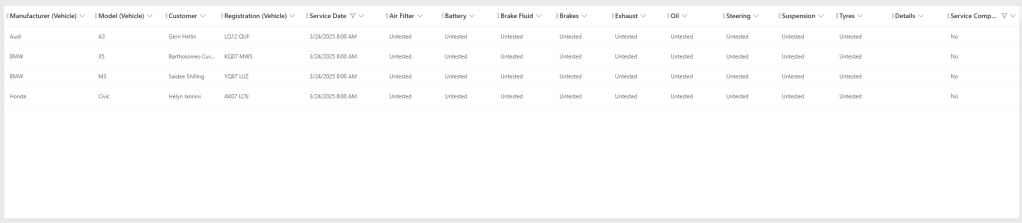
Note that our Gallery control shows all rows of the Service table. We should limit this to show only those service appointments for the current date, and there are a few way we can do this.
The easiest way to do this is to put a Filter on the Items property of our Gallery control – here we set this to be Filter(Services, IsToday(‘Service Date’)) which will return only those rows where the Service Date is today.

Which yields the desired result:
Eagle eyed readers will notice the yellow warning line on the formula bar and the warning triangle next to our Gallery:

Delegation warning. The “IsToday” part of this formula might not work correctly on large data sets.
The problem here is that we are performing the IsToday function on every row of the Services table – that is, the complete dataset is loaded into our app. This will cause performance issues as the size of the dataset increases. This is a common mistake developers make, and not just in Power Platform – an application performs well on release date, only for performance to degrade with time because the application has not been designed to handle a growing dataset.
If we are using Dataverse, one way we can solve this is by using Views. From the solutions view of our app, select Tables > Services > Views from the side navigation and create a new view called “My Service Workload” (see this post for a reminder on creating Views).
Add in the columns we need:
- Manufacturer (Vehicle)
- Model (Vehicle)
- Customer
- Registration (Vehicle)
- Service Date
- Air Filter
- Battery
- Brake Fluid
- Brakes
- Exhaust
- Oil
- Steering
- Suspension
- Tyres
- Details
- Service Complete
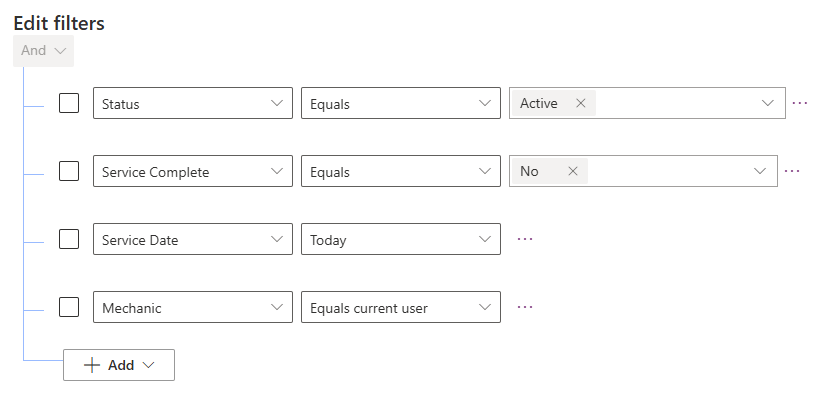
Edit the filters on our view:
- Status Equals Active
- Service Complete Equals No (only show unfinished services)
- Service Date Today
- Mechanic Equals current user (only display the items for the logged in user)
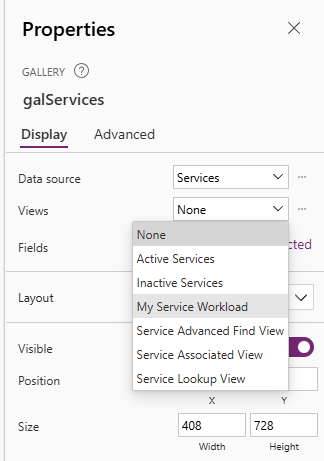
Save and publish our View. Return to our canvas app and select our Gallery control. From the Properties menu on the right of the screen, set the Views property to our newly published View.
And now our app is updated to show only those service appointments that match the filter criteria of our View.

This is a definite improvement over the use of the Filter formula directly in the formula bar, but this approach has two problems:
- It only works for Dataverse.
- We still have a handle on the Service dataset in our app.
The latter will become a problem if we have a rapidly increasing dataset. Ideally, we don’t want to link to the Service dataset directly, but indirectly via Power Automate so that we can only fetch the limited number of records we need at any one time. This concept is called delegation.

Leave a reply to Building Canvas Apps Part 5: Working with larger datsets – Pagination and Filtering – Power Platform Pete Cancel reply