
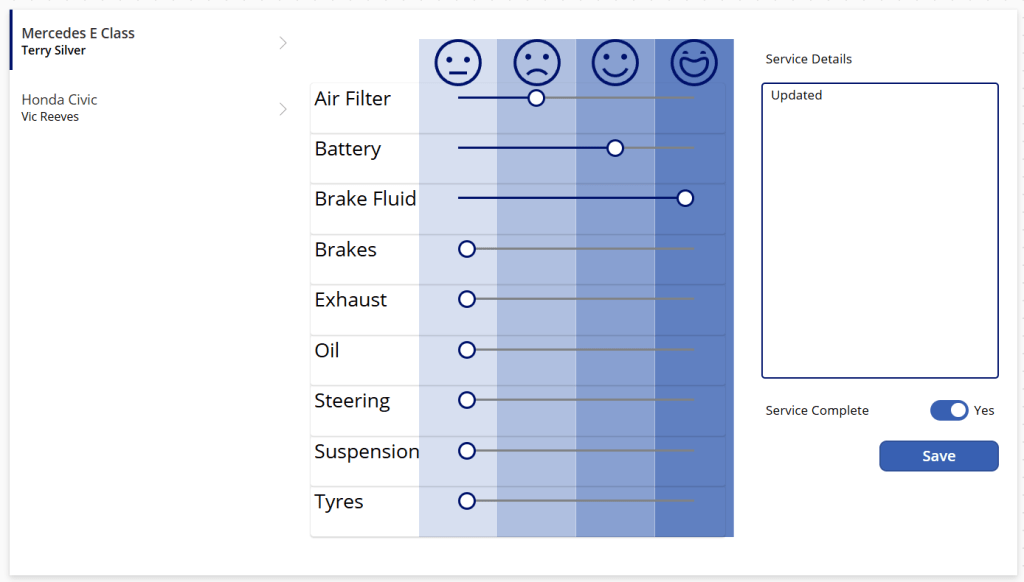
Now we want to persist the values to the Service table. Let’s add a Save button to the canvas.
We need to add some custom logic to map the numerical Slider values to Choice options. From the component menu, select the App and set the OnStart property as follows.
Collect(TestStatusLookup,
    { ID : Int(('Vehicle Check Status').Untested), Value : ('Vehicle Check Status').Untested },
    { ID : Int(('Vehicle Check Status').Unsatisfactory), Value : ('Vehicle Check Status').Unsatisfactory },
    { ID : Int(('Vehicle Check Status').Satisfactory), Value : ('Vehicle Check Status').Satisfactory },
    { ID : Int(('Vehicle Check Status').Replaced), Value : ('Vehicle Check Status').Replaced }
);
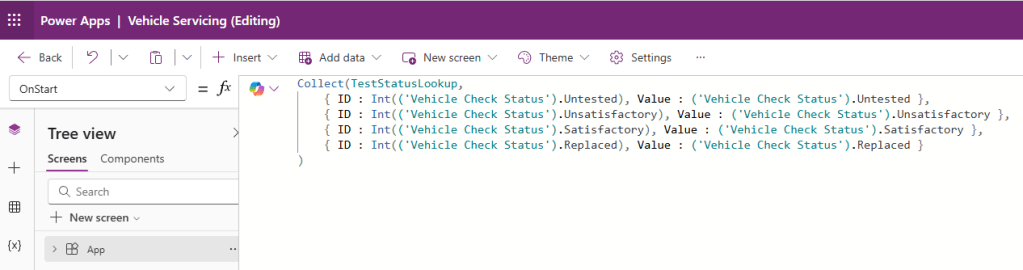
This creates a lookup table called TestStatusLookup, which we will use shortly. This will only load once the app has started; in order to take effect, save your work and refresh your page.
Next, we must set the logic on the save button. Select the button and set the OnSelect property as follows:
Patch(Services, galServices.Selected, {
    'Air Filter': LookUp(TestStatusLookup, ID=sldAirFilter.Value).Value,
    'Battery': LookUp(TestStatusLookup, ID=sldBattery.Value).Value,
    'Brake Fluid': LookUp(TestStatusLookup, ID=sldBrakeFluid.Value).Value,
    Brakes: LookUp(TestStatusLookup, ID=sldBrakes.Value).Value,
    Exhaust: LookUp(TestStatusLookup, ID=sldExhaust.Value).Value,
    Oil: LookUp(TestStatusLookup, ID=sldOil.Value).Value,
    Steering: LookUp(TestStatusLookup, ID=sldSteering.Value).Value,
    Suspension: LookUp(TestStatusLookup, ID=sldSuspension.Value).Value,
    Tyres: LookUp(TestStatusLookup, ID=sldTyres.Value).Value,
    Details: txtServiceDetails.Text,
    'Service Complete': tglServiceComplete_2.Value
    });
Refresh(Services);
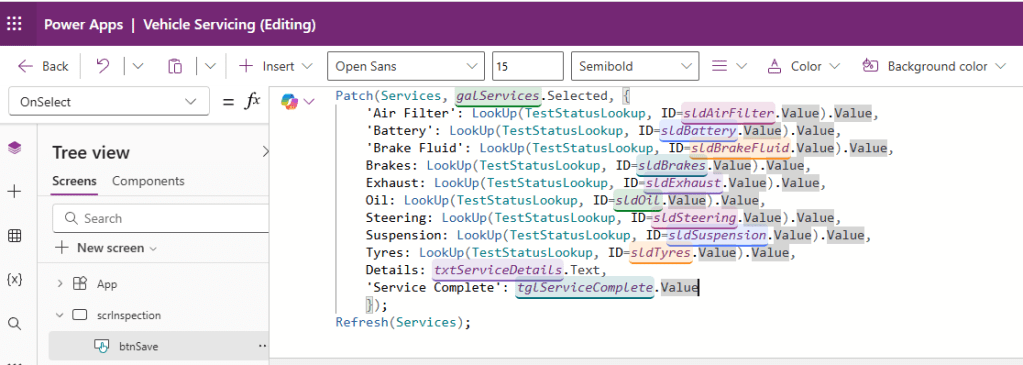
- We use the Patch function here to update a single record from the Services dataset.
- The record we update is galServices.Selected – the currently selected item from the Gallery.
- For each test item, we use the LookUp function to find the Choice value from TestStatusLookup where the ID value matches the value of the Slider for the test.
- We set the Details property to match the txtServiceDetails text input control.
- We set the Service Complete property to match the value of the tglServiceComplete toggle control.
- We refresh the Services dataset.
And that’s our app! Visually I think it’s a big improvement on our previous look, but let’s examine what we’ve learned here.
- Forms may not be as visually appealing as custom controls, but require much less configuration to be functional.
- We’ve learned about horizontal and vertical containers and how to embed one inside the other.
- We’ve worked with Sliders, Toggles and their relevant properties.
- We’ve resized rectangles, learned about opacity and setting properties such as height, width and position relative to other controls, as well as Send to back.
- We’ve created lookup tables.
- We’ve used the Patch function to update Dataverse records.
There’s still some work to do though – at present, our app reads all rows from the Services table. In the next post we’ll address how to filter the data source to show relevant records for the app user.

Leave a comment