
At this stage in our series of posts, we’ve familiarised ourselves with:
- Dataflows and the range of data sources available.
- Using Power Query to transform imported data.
- Using Power FX in custom formulae.
- Creating Alternate Keys on tables.
In the previous post, we added records to our Manufacturer table, using Power FX to assign random numbers for our Manufacturer Code column, which we defined as the Alternate Key on this table in the second post on this series. However, we have yet to put those keys to use. Today is the day!
In this post we add in our “related reference tables”. Like our “reference” tables, they are not updated frequently, but they do have a foreign key relationship with other tables in our data model. In our LaRusso Autos app, our Model table fits this criteria:
- The Model table has a foreign key relationship to the Manufacturer
- BMW 5 Series Estate
- Audi A6 Saloons
- Honda Civic Hatchback
- The Model table is updated much less frequently than the Vehicle table, as the dealership can have several Vehicles of the same Model for sale.
As per the previous post, create a new Dataflow named Import Models, and we use the same CSV file as our data source. From the Power Query screen, select the Choose columns button in the top ribbon to select the subset of columns we are interested in for this Dataflow, namely:
- Manufacturer
- Model
- Chassis

This will give us the subset of columns we require. As per the last post, we only want to add new records to Dataverse. In that post, we queried the Manufacturer table to find Manufacturer Names we had seen before, and excluded those from our data import.
In this post, we want to query the Model table for Models we have seen before, but we want to search on a concatenation of three fields:
- Manufacturer Name
- Model Name
- Chassis
Click on Add column > Custom button from the top ribbon and complete the dialog as follows:
- New column name – FullModelName
- Data type – Text
- Custom column formula – [Manufacturer] & “-” [Model] & “-” [Chassis]

Click OK and we have our new FullModelName column:

Now we want to compare this data with the contents of the Manufacturer table. As per the previous post, click Home > Get data > More… from the top ribbon. Select Dataverse as our data source, sign in and select the Manufacturer and Model tables before clicking the Transform data button.
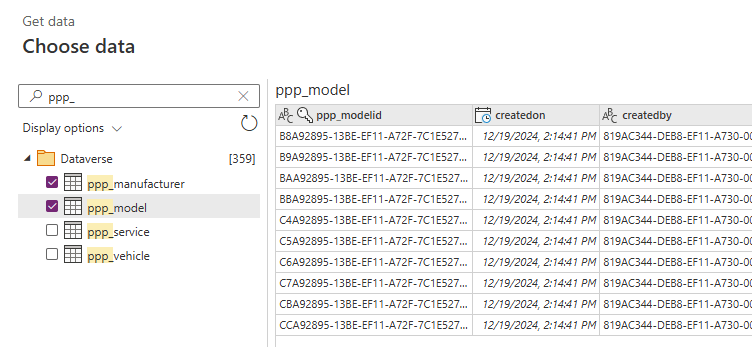
Once loaded, select the Model table and select the Choose columns button in the top ribbon to select the subset of columns we are interested in for this Dataflow, namely:
- Manufacturer Name
- Name
- Chassis Type
- Model Code
- Manufacturer

Click OK. The data table will load, but the Manufacturer column will simply say [Table]. Right click on the header and select Choose columns. Select the Manufacturer Code column (ppp_manufacturercode) and click OK.
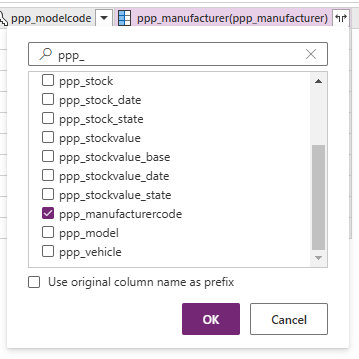
The resulting data gives us the details of each Model, including its Model Code and the Manufacturer Code for its parent Manufacturer.

We want to add a FullModelName column to this dataset also, so that we can compare it with our imported data. However, the Chassis Type columns is an integer, because in our table it is a Choice column with the following options:

With this information, we can create a new column to give us the Chassis Type Name we require. From the top ribbon click Add column > Conditional column when highlighting our Model dataset.

In the Add conditional column dialog that appears, set New column name to ChassisName. Complete the dialog as follows before clicking OK.
- If ppp_chassistype equals 894400000 Then Convertible
- Else if ppp_chassistype equals 894400001 Then Coupe
- Else if ppp_chassistype equals 894400002 Then Estate
- Else if ppp_chassistype equals 894400003 Then Hatchback
- Else if ppp_chassistype equals 894400004 Then MPV
- Else if ppp_chassistype equals 894400005 Then Pickup
- Else if ppp_chassistype equals 894400006 Then Saloon
- Else if ppp_chassistype equals 894400007 Then SUV

And now we have the required name of the Chassis Type.

Now we want the FullModelName column on our Dataverse dataset. Click on Add column > Custom button from the top ribbon and complete the dialog as follows before clicking OK.
- New column name – FullModelName
- Data type – Text
- Custom column formula – [ppp_manufacturername] & “-” [ppp_name] & “-” [ChassisName]

Now we want to merge out two datasets into a single query. Select the CSV imported dataset, and click the Merge queries button. Complete the Merge dialog as follows:
- Select the FullModelName column from the first dataset
- Right table for merge – Model table (ppp_model)
- Select the FullModelName column from the second dataset
- Join kind – Left outer
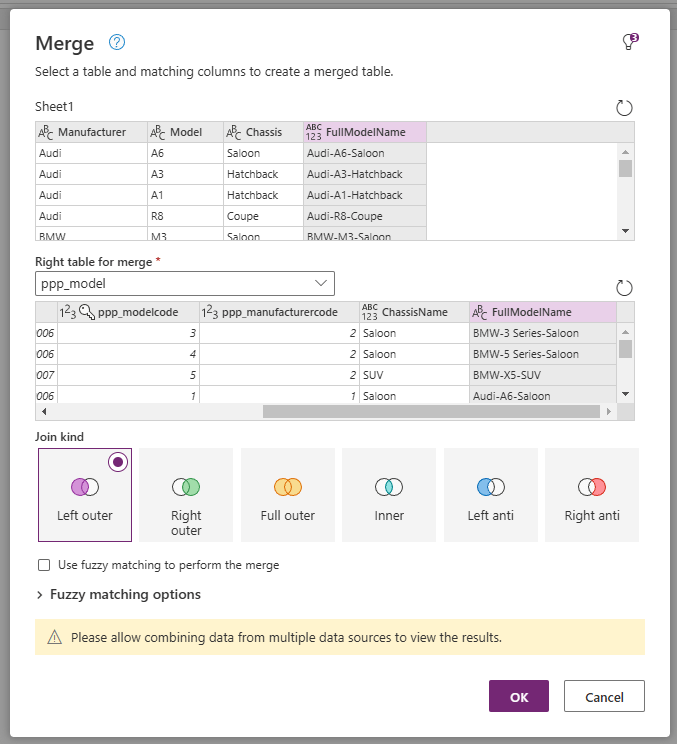
Click OK. This will update our first dataset by matching all known Models with the records in Dataverse, and the others with no match. Click on the ppp_model column and select the FullModelName column before clicking OK.

Now we can see which Model records we have a match for, and which we do not.

As per the previous post, we only want to add new records to our Model table i.e. the ones with no match. Click on the Filter rows button in the top ribbon and select Keep rows where “FullModelName.1” equals null before clicking OK.

And so we have our list of new models.

However, we do have a number of duplicate models here which we should remove. To solve this, right click on the FullModelName column header and select Remove duplicates from the dialog that appears.
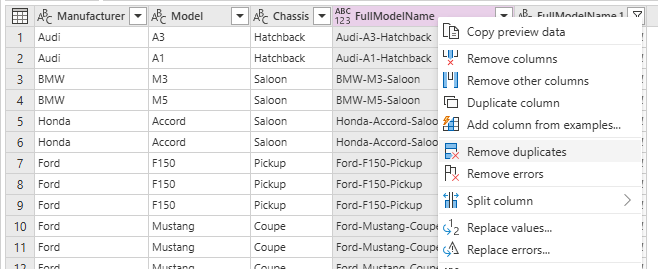
Actually, we could have done this step much earlier, but we end up with the same result in the end:

As these are new records, we want to assign them a value for Model Code (the Alternate Key we created in the second post in this series). Again, we click on Add column > Custom column from the top ribbon and enter the following values before clicking OK.
- New column name – ModelCode
- Data type – Whole number
- Custom column formula – Int64.From(Number.RandomBetween(10000,100000))
The custom Power FX formula value assigns each record a random value between 10000 and 100000. Such a wide range would reduce the possibility of duplicate values.

As we have imported all Manufacturers in the previous post, we now wish to do another merge to get the Manufacturer Code for each Model. Select the CSV imported dataset, and click the Merge queries button. Complete the Merge dialog as follows:
- Select the Manufacturer column from the first dataset
- Right table for merge – Manufacturer table (ppp_manufacturer)
- Select the Name column from the second dataset (ppp_name)
- Join kind – Inner

With an Inner join, we will only show those records in our dataset where a matching Manufacturer exists in the Manufacturer table. However, because we have already imported all the new Manufacturers from the previous post, the choice of join makes no difference here.
From the resulting dataset, right click on the ppp_manufacturer column and choose the ppp_manufacturercode column before clicking OK.

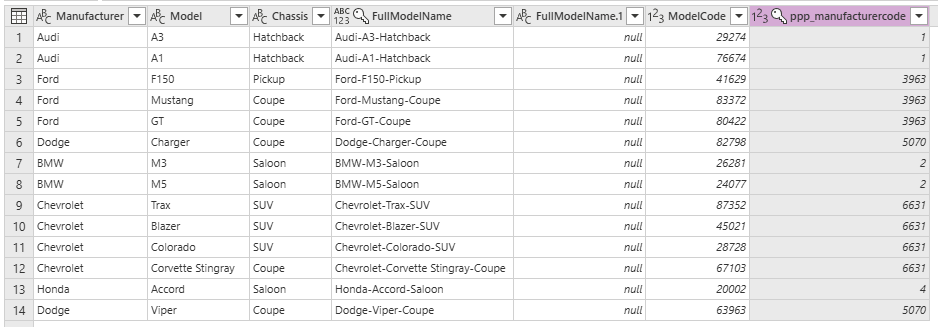
Now we have all our new records to add to the Model table. Pay particular attention to the ppp_manufacturercode column before clicking Next at the bottom right of the Power Query dialog.
On the Choose destination screen, complete the Load settings section as follows:
- Load to existing table
- Destination table – Model table (ppp_Model)
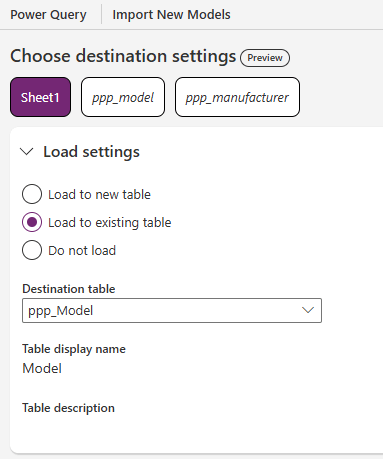
Set the Import method to Append.

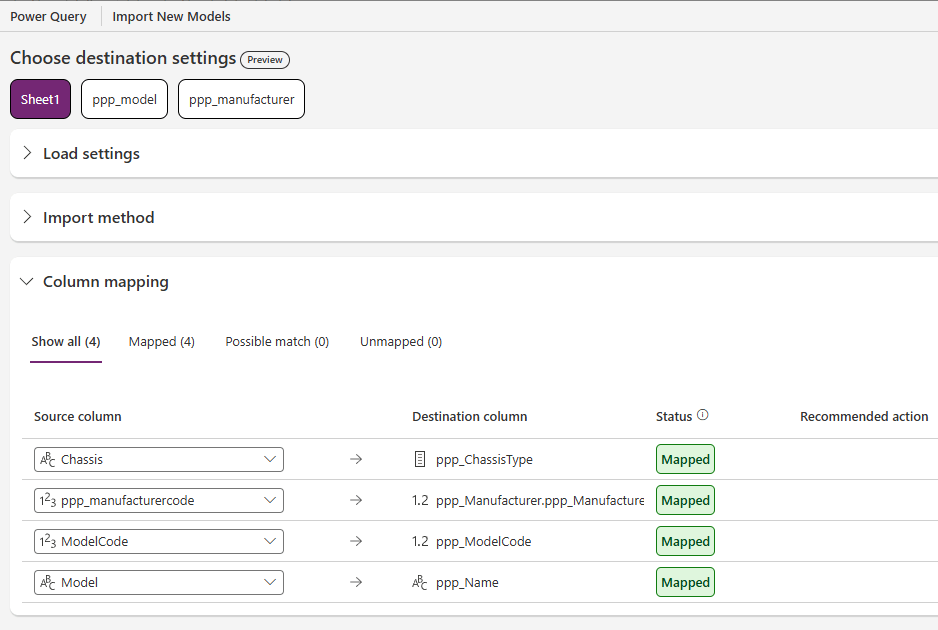
Complete the Column mapping section as follows:
- Chassis -> ppp_ChassisType
- ppp_manufacturercode -> ppp_Manufacturer.ppp_ManufacturerCode
- ModelCode -> ppp_ModelCode
- Model -> ppp_Name
The Chassis mapping is interesting because we are mapping a Text value into a Choice value. Dataverse will allow this as long as the text matches a label in our Chassis Choice Type (see above).
The second mapping here is even more interesting. This is how we successfully map the Manufacturer-Model foreign key relationship when using Dataflows. The Destination column here is ppp_Manufacturer.ppp_ManufacturerCode, denoting a relationship on the ppp_Manufacturer table, specifically the ppp_ManufacturerCode column. Let’s see what happens on import…
Before publishing the Dataflow, select the ppp_model and ppp_manufacturer datasets. In both cases, set the Load settings section to Do not load. Publish the Dataflow and wait until the refresh has completed.
If we view our Manufacturer table, we can see our new Model records. Furthermore, we can see how they have been successfully mapped to their parent Manufacturer, and thus we have the foreign key relationship we require!

This is also visible in the LaRusso Autos app.

So we have successfully added our new Model records. Once again, our Dataflow is only loading to a single table, but we’ve strengthened our knowledge of Power Query and Power FX along the way, and have put our Alternate Key theory into practice.
We could combine our efforts here into a single Dataflow, but that would make it more complex and thus more difficult to maintain. Personally, I’m a big fan of the KISS Principle.
Our next post in the series will see us importing all our Vehicle records, and leans on everything we have learned so far. See you then!

Leave a comment